
Shopee
Showing posts with label Tutorial. Show all posts

Wednesday, July 28, 2010

Tutorial: How to Change Blog Template

Attention: This tutorial is specially posted for Beginner.
*******

Feeling bored of your own blog layout? Envy of looking to other people's blog which looks more colourful, beautiful and attractive?
Now, you can have your blog to change the look as you desired, without knowing any about HTML code.

Just follow these simple quick guide to transform your blog design.

1. Browse on Internet to find your favourite layout design.
For instance, just type 'free blog template for blogspot' in Google.com, and you'll see there are a lot of websites offering this product.


Recommended webpages:
2. Keep on searching and when you've found the suitable template, just click the link/button 'Download' on that particular template. This 'Download' link will lead you to save XML file.
(But it's not necessarily shows 'Download', so you need to look for the correct link.)

After that, just save the file on your computer.


 3. Login to blogger.com --> Dashboard --> Design --> Edit HTML --> Browse the XML file --> Upload
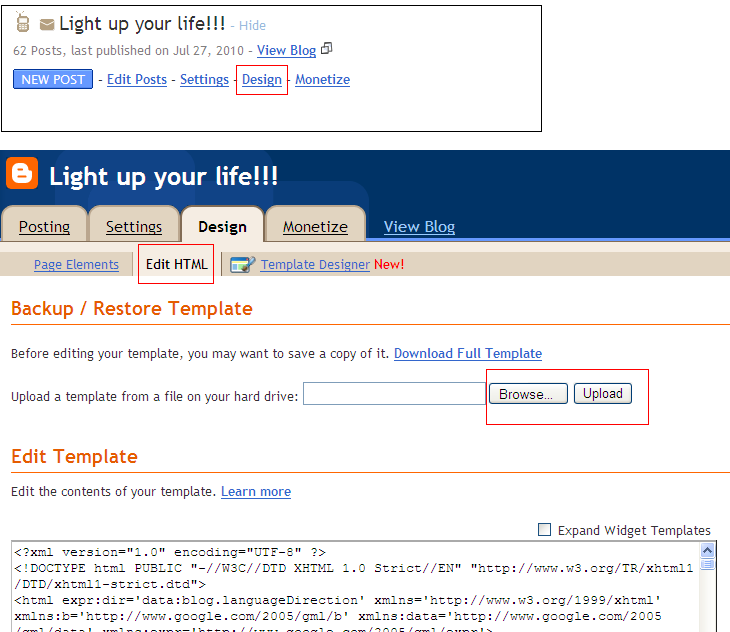

Please ensure it is XML file, not ZIP or others.
Example:
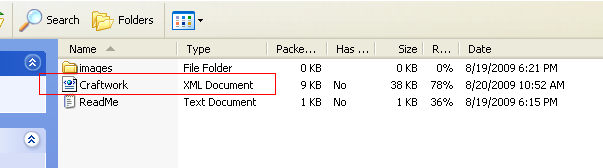

And you're advised to save your current Template code to other file such as Notepad, before Uploading the XML file.

4. Choose 'Keep Widgets' --> Save.
(You may delete the widget later if you don't want it)

5. Open your blog and you'll see the changes right away!

To re-arrange the Widgets, you can do so by going to Design --> Page Element.


To re-edit the fonts, click at Template Designer --> Advanced


After editing, just click Apply To Blog button.

That's all. Happy Designing. Cheers~

Tuesday, July 27, 2010

Tutorial: 'Reply to Comment' link

What is 'Reply to Comment' link?

This is an option that will help you to reply to an individual comment with just one click. Easier and faster. However, this option needs to be added manually which requires a piece of code.

Example:
You could rename the link as 'Reply', 'Reply to Comments', 'Balas' or to any words you prefered.

So, here's the step-by-step:

1- Login to blogger.com --> Dashboard --> Design


2- Click 'Edit Html' and Tick the 'Expand Widget templates' box


3- Look for this code:
<data:commentPostedByMsg/>
(Press Cltr+F to search it)

4- Paste the below codes just after <data:commentPostedByMsg/>

<span class='comment-reply'><a expr:href='"https://www.blogger.com/comment.g?blogID=YOUR-BLOG-ID&postID=" + data:post.id + "&isPopup=true&postBody=%40%3C%61%20%68%72%65%66%3D%22%23" + data:comment.anchorName + "%22%3E" + data:comment.author + "%3C%2F%61%3E#form"' onclick='javascript:window.open(this.href, "bloggerPopup", "toolbar=0,location=0,statusbar=1,menubar=0,scrollbars=yes,width=400,height=450"); return false;'>[Reply to comment]</a></span>


5- You need to replace the word YOUR-BLOG-ID with your real blog id which can be found at your URL Address bar.
The word Reply to comment  also can be changed, up to your own preference.

 6- After that, just click SAVE TEMPLATE button. Then go to Settings --> Comment


7. Please take note, this code will not work for 'Full Page' and 'Pop-up Window' type of comment form.
So you need to ensure that you've chosed 'Embedded below post' type instead.

8. Click SAVE SETTINGS and it's now done!

Try going back to your blog, and you'll see the 'Reply to Comment' link appears next to the visitor's name.

Hooray! Clap! Clap! Clap!
Related Posts with Thumbnails